Use OpenVPN to create a secure tunnel between our scanning servers and your network
Pro Basic ❌ / Pro Advanced ✔️ / Enterprise ✔️
If you can’t run the VM agent, you can also set up an Open VPN tunnel and Import the configuration file to the platform through the VPN Profiles tab. This way, our scanners can reach the hosts from your internal network through the VPN tunnel.
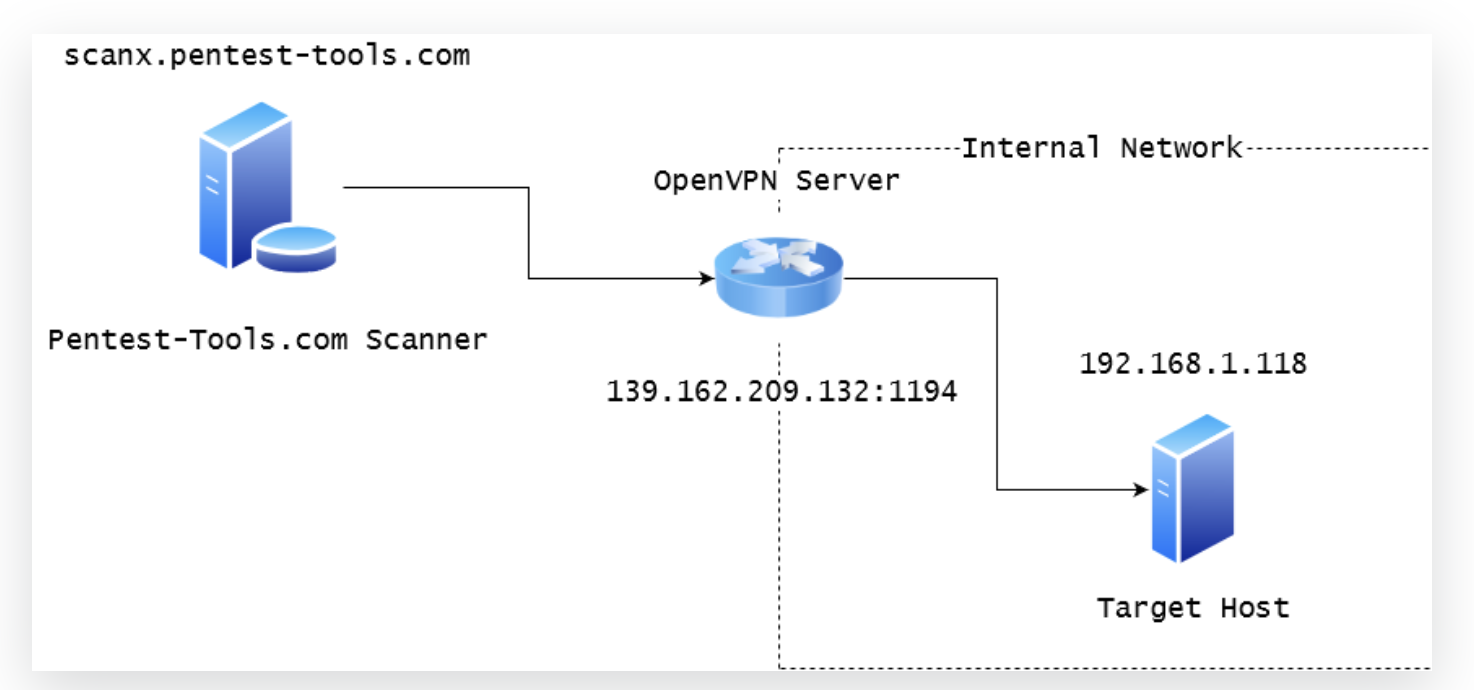
Let’s consider a scenario where we want to run the TCP Port Scanner against a target inside the private network 192.168.1.0/24.
The sample OpenVPN server can be publicly accessed at IP 139.162.209.132 on port 1194 (default for OpenVPN service) and it is also set as the default gateway for your internal target host.
Let’s see how to configure this setup such that our scanner can reach the internal host, as in the diagram below:
Step 1: Export the configuration file from the OpenVPN Server
You should export the .ovpn configuration file from your OpenVPN server. This file contains information for an OpenVPN client to connect to the server. You can typically export this file directly from the web interface of your VPN gateway or router.
If you want to install a new OpenVPN server inside your network, we recommend checking out this script that simplifies the process.
As not all Open VPN configurations are compatible with the Pentest-Tools.com platform, the exported .ovpn file should look like the example below. You should pay attention to the following lines:
- remote {your-external-ip} {port} – Make sure that your external IP is right and the port is not blocked by any firewall. Here is an iptables guide to properly open the VPN port.
- proto {TCP/UDP}– We recommend using TCP over UDP for a more reliable connection.
- dhcp-option DNS {internal-dns-ip} (Optional) – This is required if you have an internal DNS Server inside your local network and you want to scan targets by their hostname.
config.ovpn

client

dev tun

proto tcp

sndbuf 0

rcvbuf 0

remote 139.162.209.132 1194

resolv-retry infinite

nobind

persist-key

persist-tun

remote-cert-tls server

auth SHA512

cipher AES-256-CBC

setenv opt block-outside-dns

key-direction 1

verb 3

<ca>

-----BEGIN CERTIFICATE-----

MIIDQjCCAiqgAwIBAgIUBa2MqM7dbcE5eePAwPituT+RqZAwDQYJKoZIhvcNAQEL

BQAwEzERMA8GA1UEAwwIQ2hhbmdlTWUwHhcNMTkwOTEyMTI1NDEwWhcNMjkwOTA5

MTI1NDEwWjATMREwDwYDVQQDDAhDaGFuZ2VNZTCCASIwDQYJKoZIhvcNAQEBBQAD

ggEPADCCAQoCggEBAMnIwLMKPAg8BzPPslPoprPi8FmoNVQfGopCHAZg1BaHXqWS

g9pfWkUlNr4yIbsb9INw89pLYELsThDj+gBCRW/SMND/RaJo+VGBeThGnv31bXKe

tLtifO9sb8xucwnn0gfwr7yEBfkU/hAPYZM4gRPxjLBmWv8TEFdvrx6o6fGvCNuu

G9+2qXLCUDpHnuvHO4lfeRlM+RPU4LhrL2GUOvRRTf17Xv4ttEo6NdxRNKkE+DeFCOPY
Step 2: Create a VPN profile with the Custom Open VPN option
From the Settings > VPN Profile page, add a new VPN profile with the second option.
Upload your .ovpn file in the configuration window. You can also enable user authentication if your server has this setting.
Once added, it is recommended to test the configuration by clicking the Play button from the Actions column.
You are ready for your first internal scan if your VPN connection is successful. However, if you encounter any problems with the connection, you can troubleshoot the problem by viewing the connection logs (Press the View button from Actions).
Please ensure the OpenVPN port is open to the internet – this is the most encountered connection issue.